ZED Depth Camera
1 Zed Quick Started guide
1.1 Connect your camera
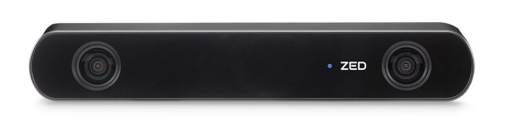
Unpack your camera, plug the camera in a USB 3.0 port and go to the next step. ZED cameras are all UVC compliant so they should be automatically recognized by your computer.
1.2 Download and install the ZED SDK
The ZED SDK is available for Windows, Linux and Nvidia Jetson platforms.But I personally recommend using Ubuntu under Linux.It contains all the libraries that powers your camera along with tools that let you test its features and settings.
Select your platform and follow the installation guide: Linux, Jetson,Windows.
Currently, we offer a companion SDK with Ubuntu version 18.04.
1.3 Run ZED Explorer
The ZED Explorer ( /usr/local/zed/tools/ZED Explorer ) is an application for ZED live preview and recording. It lets you change video resolution, aspect ratio, camera parameters, and capture high resolution snapshots and 3D video.
If the ZED is recognized by your computer, you'll see the 3D video from your camera.
2 Mini-PC Connection
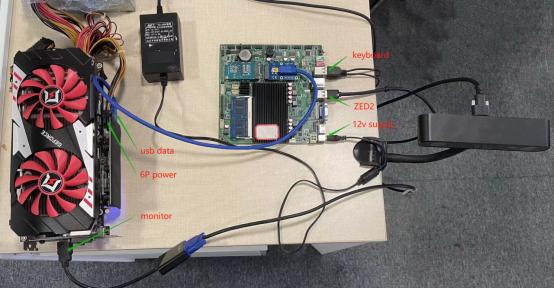
The Mini-PC we provide is connected to ZED as shown in Figure 1.Since zed's Python API calls to CUDA, we had to plug in an external graphics card(eg. NVIDIA GeForce GTX 1070).We provide the MINI-PCIE card for free, in addition, you need to prepare a graphics card and independent power supply for using it.
Relevant SDK has been installed on this Mini-PC, and after the hardware connection is completed, you can directly tune to 5 Code Samples
3 Installation SDK on Linux
- Download the ZED SDK for Linux
- Go to the folder where the installer has been downloaded
cd path/ - Add execution permission to the installer
chmod + x ZED_SDK_Ubuntu18_v3.7.run - Run the ZED SDK installer At the beginning of the installation, the Software License will be displayed, hit q after reading it.During the installation, you might have to answer some questions on dependencies, tools and samples installation. Type 'y' for yes and 'n' for no and hit Enter. Hit Enter to pick the default option.
./ZED_SDK_Ubuntu18_v3.7.run -
Setup CUDA
CUDA is an NVIDIA library used by the ZED SDK to run fast AI and computer vision tasks on your graphics card. During the ZED SDK installation, CUDA is automatically downloaded and installed by the ZED SDK if it is not detected on your computer. - Reboot At the end of the installation, restart your system to make sure your paths are updated.
sudo reboot
4 Install the Python API
This section explains how to use the ZED SDK in Python 3 on Windows and Linux platforms.
- Requirements The Python API is a wrapper around the ZED SDK which is written in C++ optimized code. We make the ZED SDK accessible from external Python code using Cython. To start using the ZED SDK in Python, you will need to install the following dependencies on your system:
- ZED SDK
- Python 3.6+ (x64)
- Cython 0.26+
- Numpy 1.13+
- OpenCV Python (optional)
- PyOpenGL (optional)
python3 -m pip install cython numpy opencv-python pyopengl
- Runing the install script A Python script is available in the ZED SDK installation folder and can automatically detect your platform, CUDA and Python version and download the corresponding pre-compiled Python API package. The Python install script is located in /usr/local/zed/
cd /usr/local/zed/
python3 get_python_api.py
That's it ! The Python API is now installed. To get started, check out our Code Samples.
5 Code Samples
We only provide reference code samles at Mini-PC( /home/ubuntu/zed2/ ), specific ZED python API documentation at https://www.stereolabs.com/docs/
5.1 Examples Overview
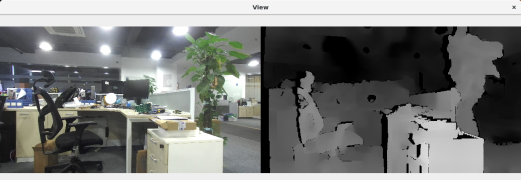
- Img_depth.py - This sample shows how to capture images and depth sensing with OpenCV. It also shows how to save data in different formats.
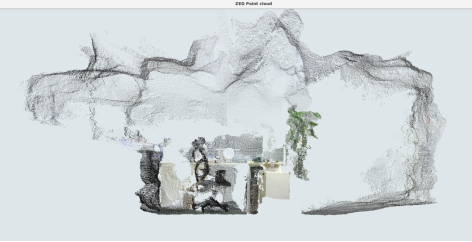
- Point_cloud.py - This sample shows how to capture a 3D point cloud and display with OpenGL.
- SVO_Recording - This sample shows how to record and playback video files in SVO format. SVO files lets you use all the ZED SDK features without hmp4ng a ZED connected
5.2 Img_depth.py
This tutorial shows how to get the image and depth from the ZED SDK. The program will loop until 300 frames are grabbed.
python3 Img_depth.py
Code Overview:
- Create a camera We create, configure and open the ZED. We set the ZED in HD1080 mode at 30fps and enable depth in STANDARD mode. The ZED SDK provides different depth modes: STANDARD, MEDIUM, QUALITY. For more information, see online documentation.
zed = sl.Camera() init_params = sl.InitParameters() init_params.camera_resolution = sl.RESOLUTION.HD1080 init_params.camera_fps = 30 err = zed.open(init_params) if err != sl.ERROR_CODE.SUCCESS: print('open error') exit(1) runtime_parameters = sl.RuntimeParameters() runtime_parameters.sensing_mode = sl.SENSING_MODE.STANDARD - Capture data Now that the ZED is opened, we can capture images and depth. Here we loop until we have successfully captured 300 images.
- We create a Mat to store the images and depth map.
- We call retrieve_measure() to get the depth map.
Image = sl.Mat()
dep = sl.Mat()
while len(timesp1) < FPS=300:
  if zed.grab(runtime_parameters)==sl.ERROR_CODE.SUCCESS:
   timestamp = zed.get_timestamp(sl.TIME_REFERENCE,CURRENT)
   zed.retrieve_image(image, sl.VIEW.LEFT)
   img_L = image.get_data()
   zed.retrieve_image(image, sl.VIEW.RIGHT)
   img_R = image.get_data()
   zed.retrieve_image(dep,sl.VIEW.DEPTH)
   dep_map = dep.get_data()
- Close camera Once 300 frames have been grabbed, we close the camera.If not, unexpected errors will occur.
5.3 Point_cloud.py
This tutorial shows how how to retreive the current point cloud.
python3 Point_cloud.py
5.4 SVO_Record
Because the raw data takes up too much space,the ZED SDK allows you to record large video datasets using H.264, H.265 or lossless compression. The SDK uses Stereolabs SVO format to store videos along with additional metadata such as timestamp and sensor data.
- Record data as svo You can modify camera parameters and FPS count to control the recording time.SVO files are saved in /home/ubuntal/zed2/svo_record/record.
python3 Record.py - Export svo to raw data
python3 ExportRaw.py "path/to/file.svo" - Export svo to data(image and mp4)
 Usage:
     python3 Export.py A B C
 Please use the following parameters from the command line:
  A - SVO file path (input) : "path/to/file.svo"
  B - mp4 file path (output) or image sequence folder(output) :
          "path/to/output/file.mp4" or "path/to/output/folder"
  C - Export mode:  0=Export LEFT+RIGHT mp4.
                       1=Export LEFT+DEPTH_image mp4.
                       2=Export LEFT+RIGHT image sequence.
                       3=Export LEFT+DEPTH_image sequence.
                       4=Export LEFT+DEPTH_image+Point_cloud sequence.
  A and B need to end with '/' or '\'
  Examples:
  (mp4 LEFT+RIGHT):  python3 Export.py "path/to/file.svo" "path/to/output/file.mp4" 0
  (mp4 LEFT+DEPTH):  python3 Export.py "path/to/file.svo" "path/to/output/file.mp4" 1
  (SEQUENCE LEFT+RIGHT):  python3 Export.py "path/to/file.svo" "path/to/output/folder" 2
  (SEQUENCE LEFT+DEPTH):  python3 Export.py "path/to/file.svo" "path/to/output/folder" 3
  (SEQUENCE LEFT+DEPTH+POINT): python3 Export.py "path/to/file.svo" "path/to/output/folder" 4